The Chicken Coop Interior That Actually Makes Your Flock Thrive (And Looks Beautiful Doing It)
There’s something quietly magical about stepping into a well-designed chicken coop — the golden morning light filtering through a small window, the soft clucking of hens settling into their nesting boxes, and the unmistakable smell of fresh straw. Whether you’re a backyard chicken keeper just getting started or someone who’s been tending a flock for years, the interior of your coop matters far more than most people realize. It’s not just about aesthetics. It’s about the health, happiness, and productivity of every single bird inside.
—
Table Of Content
1. Why the Interior of Your Chicken Coop Is the Foundation of a Healthy Flock
Most new chicken keepers obsess over the outside of their coop — the cute paint color, the charming roof shape, the little front door with its hand-painted welcome sign. And honestly? That’s fair. But experienced flock owners will tell you the same thing every time: what happens inside that coop determines everything.
The interior of your chicken coop directly impacts egg production, flock behavior, disease prevention, and the overall stress levels of your birds. Chickens are surprisingly sensitive creatures. A poorly ventilated, overcrowded, or poorly laid-out interior can lead to respiratory illness, feather pecking, egg-eating, and a host of other problems that no amount of exterior charm can fix.
Think of it this way — you could have the most Pinterest-worthy coop in your neighborhood, with a hand-lettered sign and a climbing rose over the door, but if the interior is dark, damp, and cramped, your hens will suffer. Getting the inside right is the single most important thing you can do for your backyard flock.
“A beautiful coop that doesn’t serve your chickens isn’t a coop at all — it’s a decoration.”
—
2. The Golden Rule of Space: How Much Room Do Chickens Really Need?
Before you think about roosts, nesting boxes, or feeders, you have to get your square footage right. Overcrowding is the number one mistake backyard chicken keepers make — and the consequences ripple through everything else.
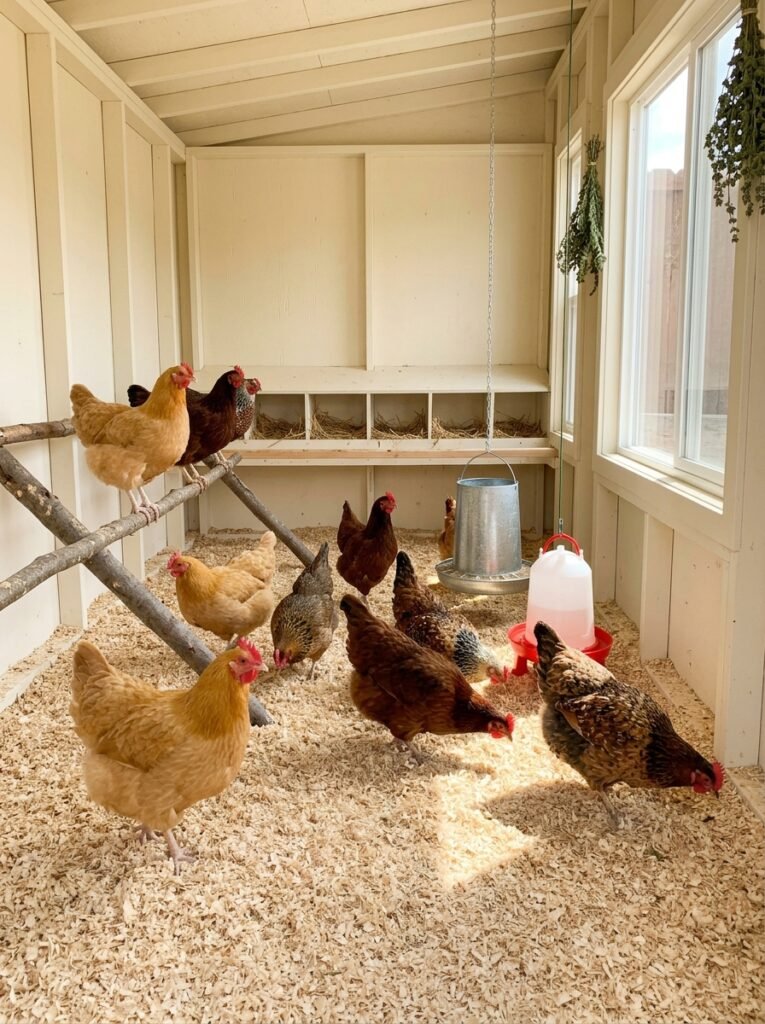
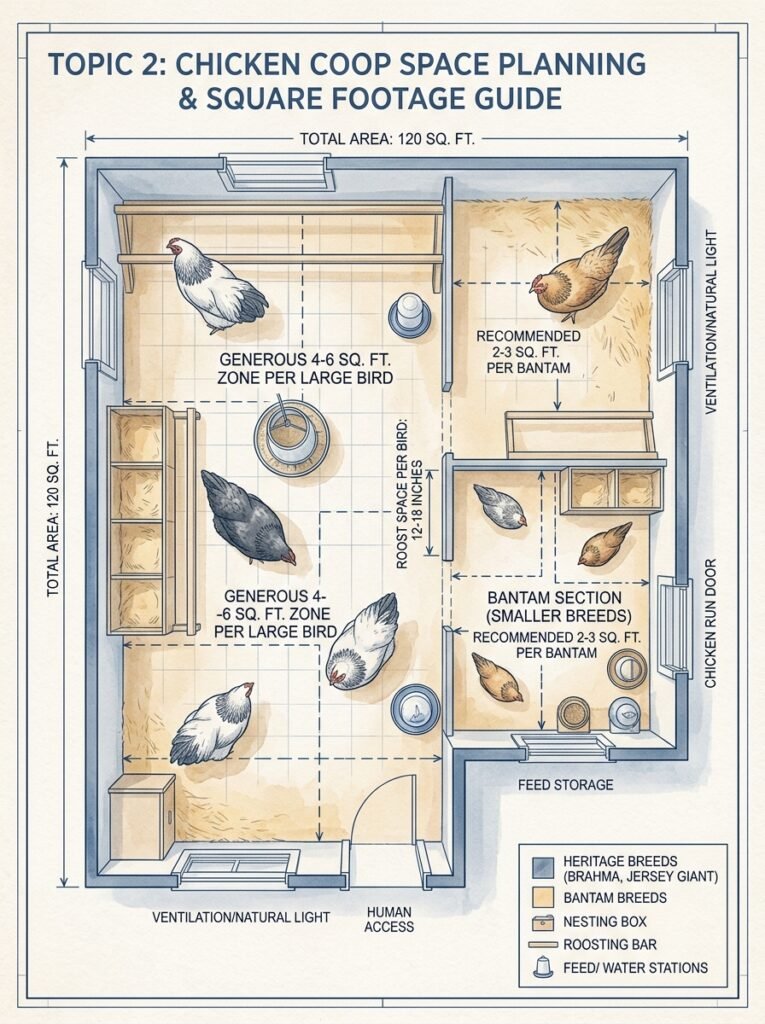
The general rule of thumb is four square feet of indoor space per standard-sized chicken. Bantam breeds can get by with two to three square feet, while larger heritage breeds like Brahmas or Jersey Giants need closer to five or six. These numbers aren’t arbitrary. They’re the minimum required for chickens to move freely, establish their natural pecking order without constant conflict, and rest without being pressed against one another.
And here’s something many beginner guides conveniently skip: these numbers are for the interior coop space alone, not including the run. Your birds will be spending a significant portion of their lives — especially during winter months, rainy seasons, or in areas with predator pressure — entirely inside that coop. Give them room to breathe, literally and figuratively.
If you’re designing from scratch, always plan for more birds than you currently have. Chicken math is a very real phenomenon, and the flock you have today is almost never the flock you’ll have in two years.
—
3. Roosting Bars: The Most Important Piece of Furniture in the Entire Coop

Chickens sleep on roosting bars — not on the ground, and not in their nesting boxes. This is instinctive behavior rooted in their wild ancestors’ need to sleep off the ground away from predators. A proper roosting setup isn’t optional; it’s essential.
The ideal roosting bar is made from untreated, natural wood — something around two to four inches wide with slightly rounded edges. Chickens actually grip their roost while sleeping, so you want a surface their feet can comfortably wrap around. Metal and plastic pipes are popular substitutes, but they don’t insulate feet during cold nights the way natural wood does.
Place your roosting bars at a height between two and four feet off the ground. Chickens will always compete for the highest roost — that’s social hierarchy in action — so if space allows, create multiple horizontal bars at slightly staggered heights. Allow at least ten inches of roosting bar length per bird, though twelve is better for larger breeds.
Keep your roosts away from drafty areas and ensure they’re positioned so that droppings fall onto a removable board beneath — a droppings board is one of the most underrated interior additions you can make, and it dramatically reduces cleaning time. Scrape it every morning and your coop stays dramatically cleaner with almost no effort.
—
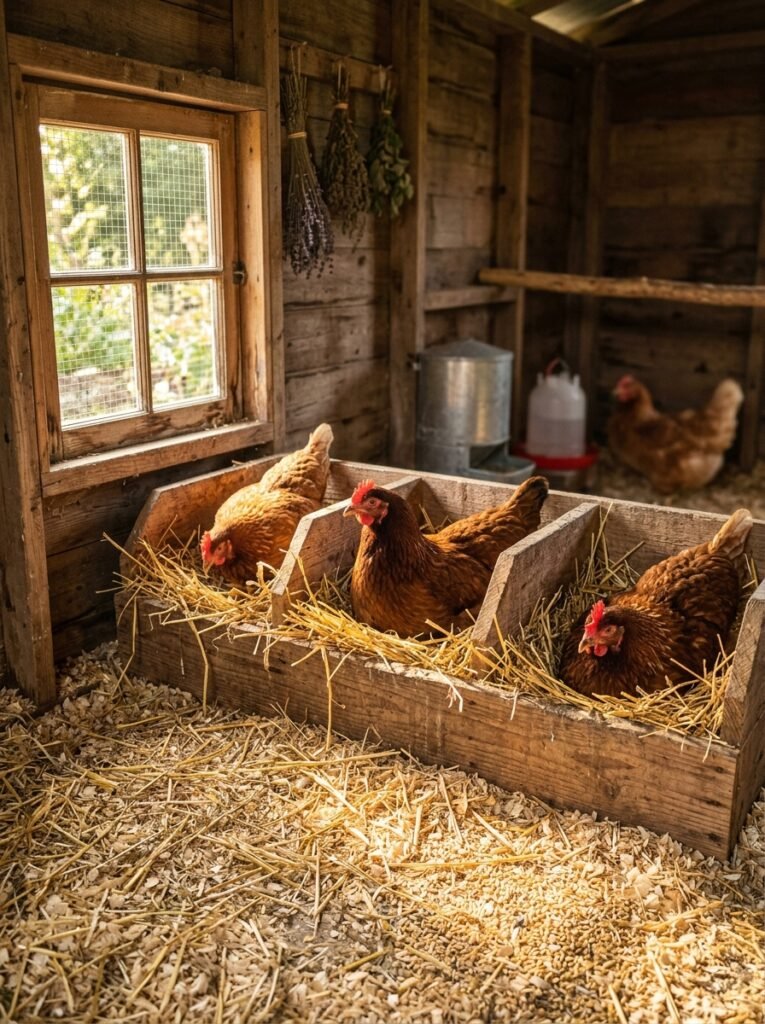
4. Nesting Boxes That Hens Will Actually Use (And Love)
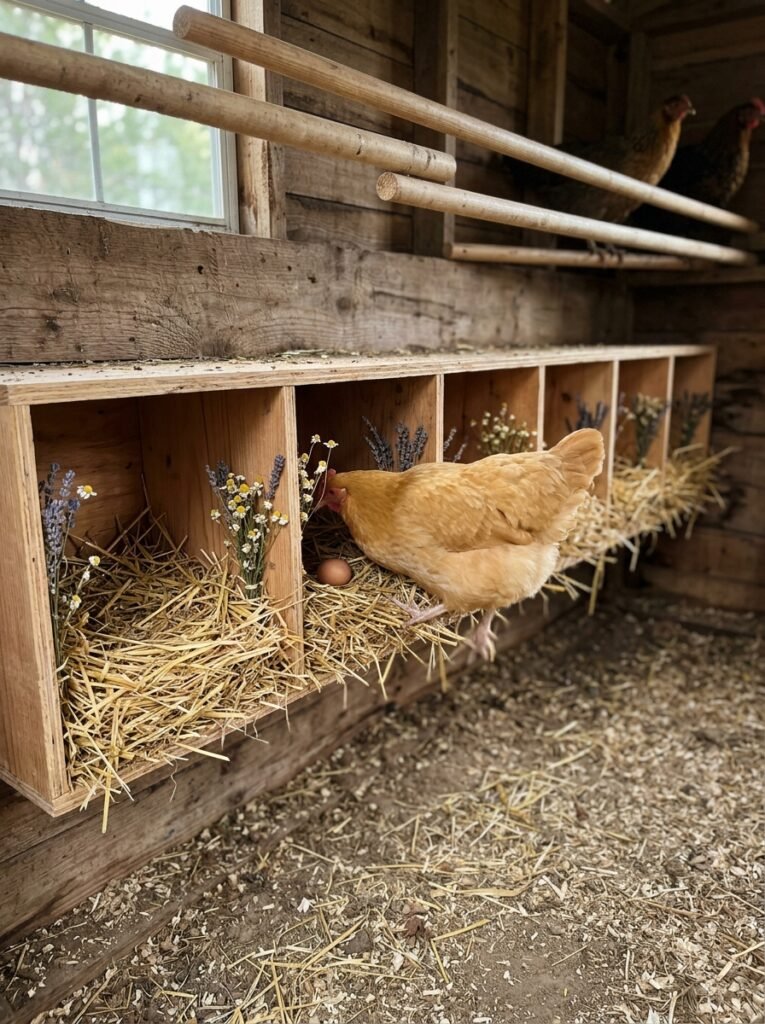
A hen looking for a place to lay her egg wants the same things you want in a guest room: quiet, comfortable, private, and ideally a little dim. Get this right and you’ll collect clean eggs in designated spots every single day. Get it wrong and you’ll find eggs in the corner, under the roost, or — worst case scenario — discover an egg-eating habit that’s incredibly hard to break.
The standard recommendation is one nesting box for every three to four hens. Go smaller than that and you’ll have traffic jams and stressed birds; go larger and hens start sleeping in the unused boxes, which leads to dirty, poop-filled nesting areas.
Each box should measure approximately twelve inches wide, twelve inches tall, and twelve inches deep for standard hens. Line them with soft nesting material — straw, pine shavings, and dried herbs like lavender and chamomile are all excellent choices. Lavender in particular has a calming effect on hens and also acts as a natural pest deterrent.
Position your nesting boxes lower than your roosting bars — this is critical. If the boxes are the highest point in the coop, chickens will sleep in them, defeating the entire purpose and creating a sanitation nightmare.
“Happy hens lay in their nesting boxes. Stressed hens lay everywhere else.”
—
5. Ventilation: The Interior Feature That Saves Lives
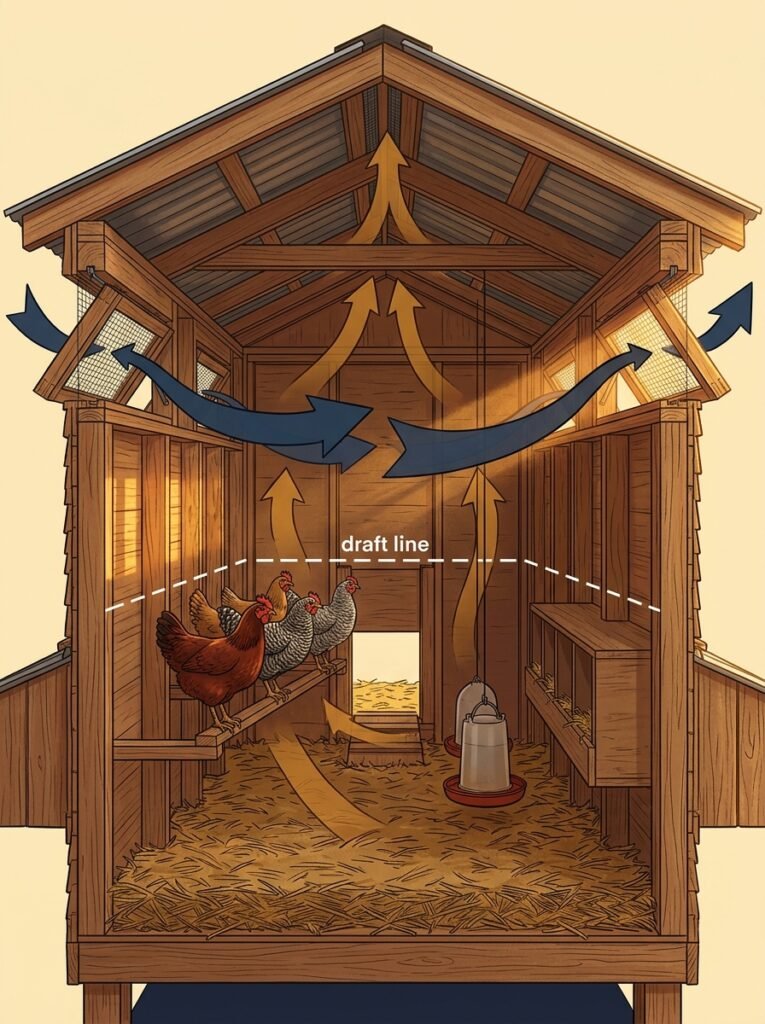
If you could only prioritize one aspect of your chicken coop interior, make it ventilation. Poor airflow is responsible for more flock health problems than almost any other single factor — and yet it’s the most commonly overlooked element in coop design.
Chickens produce an enormous amount of moisture through respiration and droppings. When that moisture has nowhere to go, it creates a humid environment where ammonia builds up, respiratory pathogens flourish, and frostbite becomes a serious risk in winter — even in moderate climates. You’ll smell the ammonia before you can see the problem, and by the time you can smell it strongly, your birds have already been breathing it for too long.
Good ventilation means openings near the top of the coop — above the roosting height — that allow moist, ammonia-laden air to escape while preventing direct drafts on the birds below. A combination of fixed vents and adjustable windows gives you seasonal control, allowing maximum airflow in summer and reduced but still-present ventilation in winter.
One square foot of ventilation per ten square feet of floor space is often cited as a starting point, but many experienced keepers will tell you to go larger. Fresh air is free, and chickens handle cold temperatures far better than they handle damp, stagnant air.
—
6. Flooring Options That Balance Cleanliness and Comfort

The floor of your chicken coop is your front line against moisture, pests, and bacteria. It’s also where your birds will spend a significant portion of their time — scratching, dust bathing if space allows, and simply moving around. Your flooring choice affects all of it.
Concrete is the gold standard for predator-proofing and ease of cleaning — it can be hosed down completely and doesn’t harbor rodents the way dirt floors do. However, it’s cold, hard, and needs adequate bedding to compensate. Wood is warm and easy to work with but absorbs moisture and bacteria over time. Hardware cloth over a raised floor offers ventilation from below but requires careful management in cold climates.
Whatever your base flooring material, the bedding on top is what your chickens actually interact with daily. The deep litter method — building up layers of pine shavings or straw over several months and allowing natural composting to occur — is beloved by many keepers for its low-maintenance approach and the natural warmth it generates through microbial activity. Spot clean regularly, add fresh bedding on top, and do a full cleanout one to two times per year.
—
7. Lighting Inside the Coop: More Important Than You Think
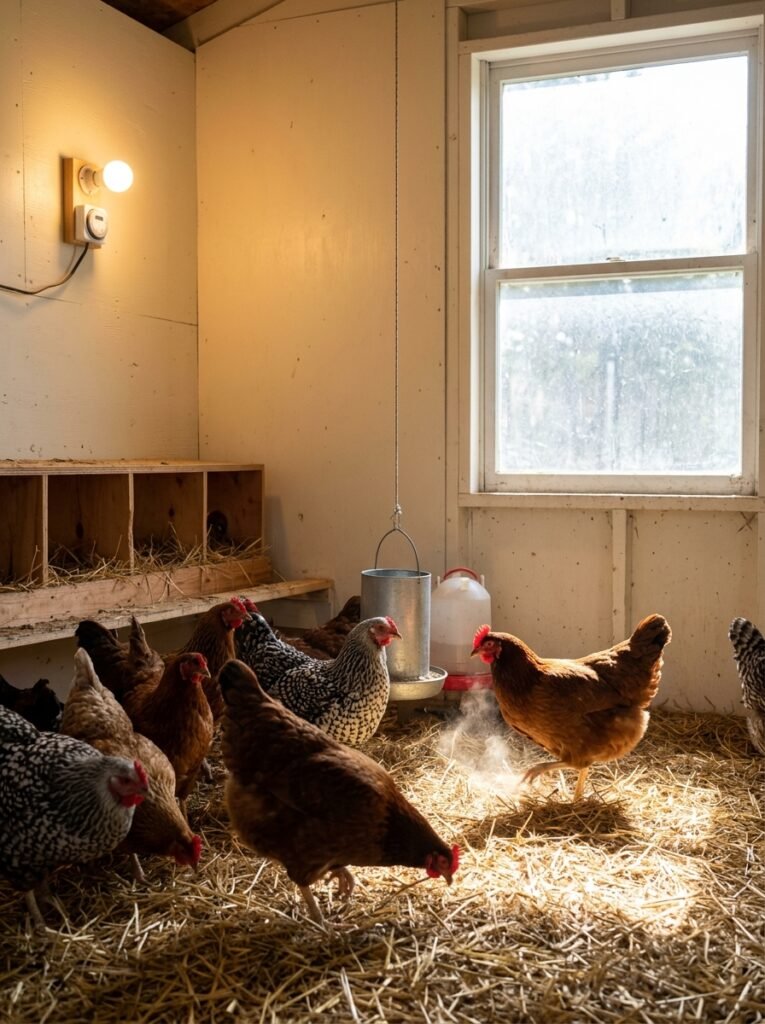
Natural light plays a powerful role in a hen’s laying cycle. Hens need approximately fourteen to sixteen hours of light per day to maintain consistent egg production — when daylight drops below that threshold in autumn and winter, egg laying naturally slows or stops as hens’ bodies prepare for a seasonal rest.
In your coop interior, this means windows matter enormously — not just for aesthetics, but for the circadian rhythm of your flock. Position windows on the south-facing wall if possible to maximize natural light hours, and use hardware cloth rather than glass or plastic if ventilation is a priority.
For keepers who want year-round production, supplemental lighting with a simple incandescent or low-wattage LED bulb on a timer can extend the light day artificially. Use warm light rather than harsh fluorescent blue-spectrum lighting, as the latter can increase aggression and stress in confined birds.
—
8. Feeding and Watering Stations: Smart Interior Placement Changes Everything
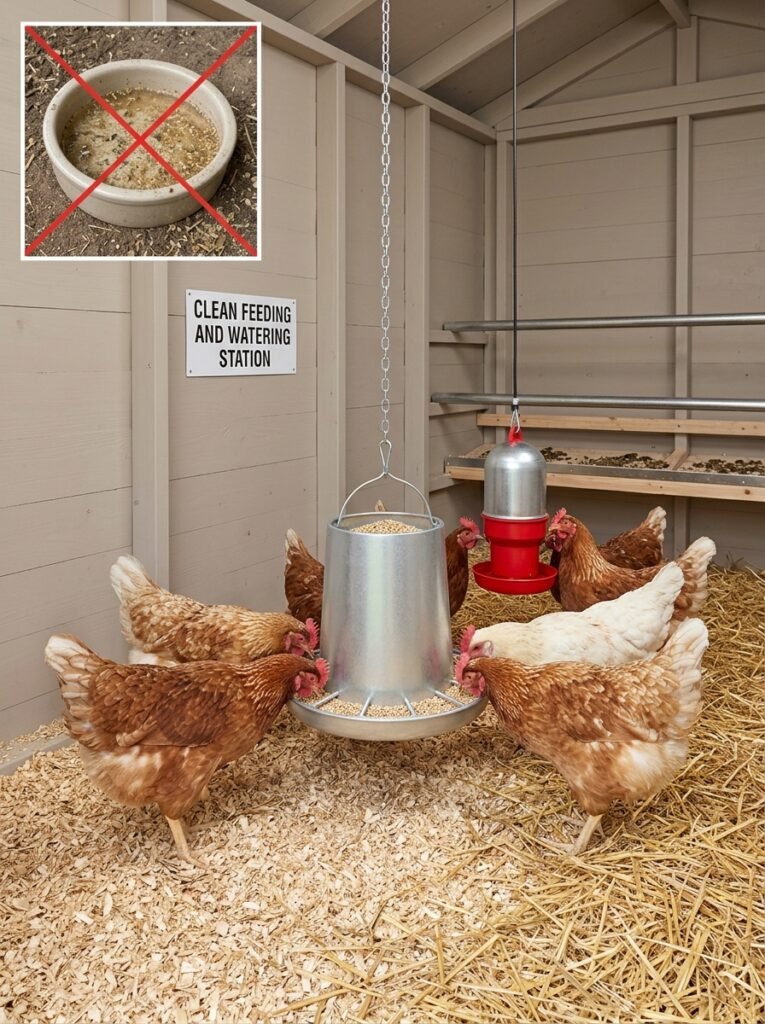
Where you place your feeders and waterers inside the coop has a bigger impact on cleanliness and flock health than most guides acknowledge. Poorly placed food and water leads to spills, wet bedding, mold growth, and constant competition among birds.
Hang your feeder and waterer at approximately the height of your birds’ backs. This positioning discourages scratching debris into the food, reduces spillage dramatically, and makes it harder for wild birds and rodents to access the feed. Use nipple-style waterers or horizontal nipple systems if possible — they’re the single best upgrade you can make for coop cleanliness, as traditional open water dishes become contaminated with shavings, droppings, and bacteria within hours.
Never place waterers directly under roosting bars. It sounds obvious in retrospect, but it’s an extremely common mistake that results in droppings contaminating drinking water overnight.
“The right feeder placement isn’t a small detail — it’s the difference between a healthy flock and a sick one.”
—
9. Interior Color and Wall Treatments That Actually Benefit Your Chickens
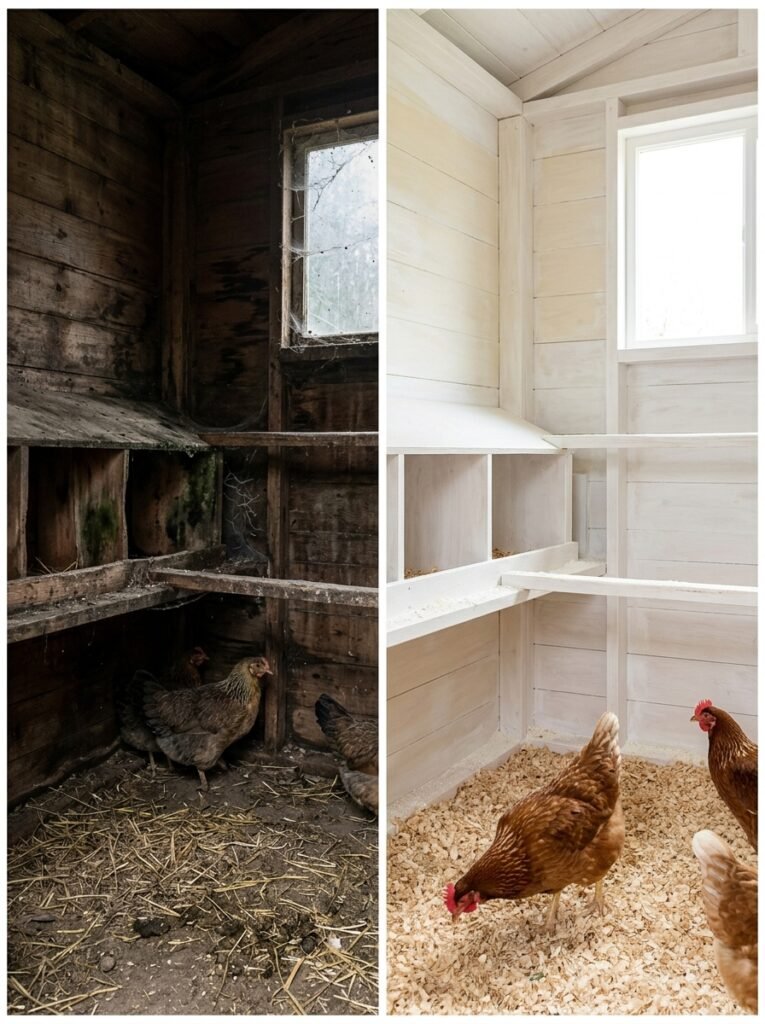
Here’s where the interior design world and the backyard chicken world overlap in the most delightful way. The walls of your coop aren’t just a structural surface — they can actively work for or against your flock’s wellbeing.
Light-colored walls — white, cream, pale yellow — reflect light and make the interior feel more spacious and bright. This is genuinely good for your hens, not just aesthetically pleasing for you. Darker coop interiors feel more enclosed, can harbor more moisture, and make it harder for you to spot early signs of mite infestations, which tend to appear in dark corners and crevices.
Painting interior walls with exterior-grade paint (properly cured before birds move in) creates a washable surface that resists moisture absorption and makes deep cleaning far more effective. Some keepers use food-grade diatomaceous earth as a wall treatment along the base of interior walls to deter mite populations. Others whitewash the interior with a traditional lime wash — a centuries-old practice that naturally deters parasites and brightens the space simultaneously.
—
10. Predator-Proofing From the Inside: Interior Features That Keep Danger Out
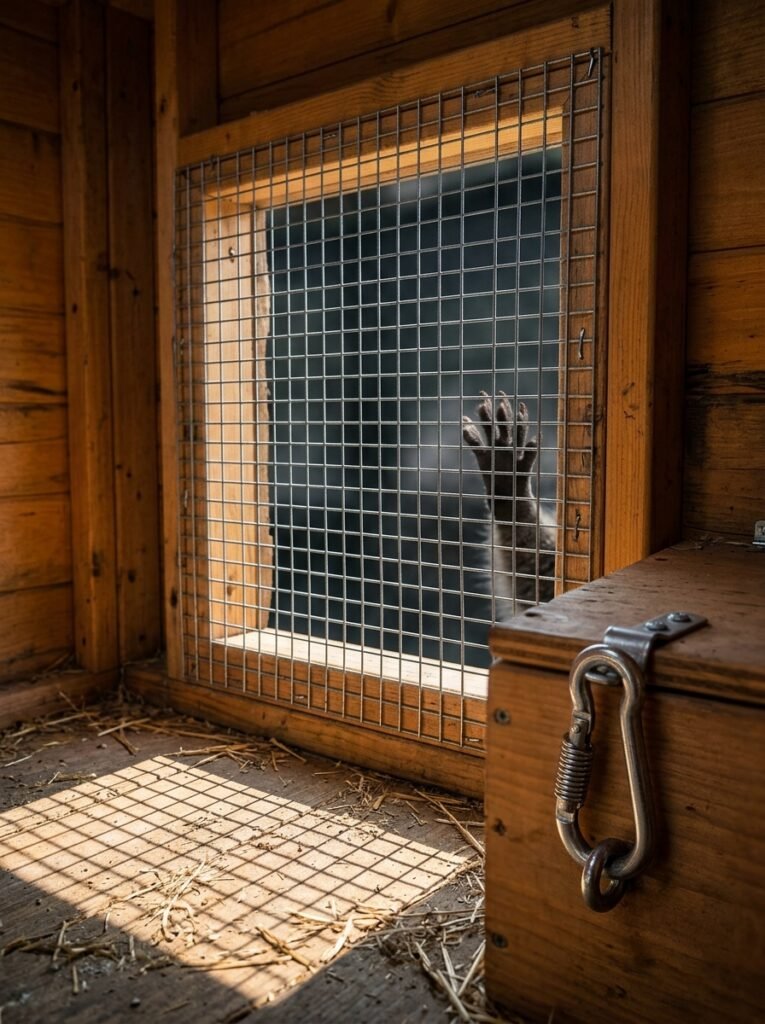
A coop’s interior security is only as strong as its weakest point. Hardware cloth — the heavy-gauge welded wire with half-inch or quarter-inch openings — is the gold standard for covering any interior openings, including windows and vents. Standard chicken wire, despite its name, is designed to keep chickens in, not predators out, and a determined raccoon or weasel can breach it with ease.
Latches on interior doors and nesting box lids should be of the carabiner or padlock-style that require two distinct movements to open. Raccoons are disturbingly clever with simple latches. Pay equal attention to the floor and the base of interior walls — weasels and rats can squeeze through openings smaller than an inch.
—
11. Seasonal Interior Adjustments: Adapting Your Coop Through the Year
A well-designed chicken coop interior isn’t a set-it-and-forget-it situation. The most successful chicken keepers treat their coop interior as a living system that requires thoughtful seasonal adjustment.
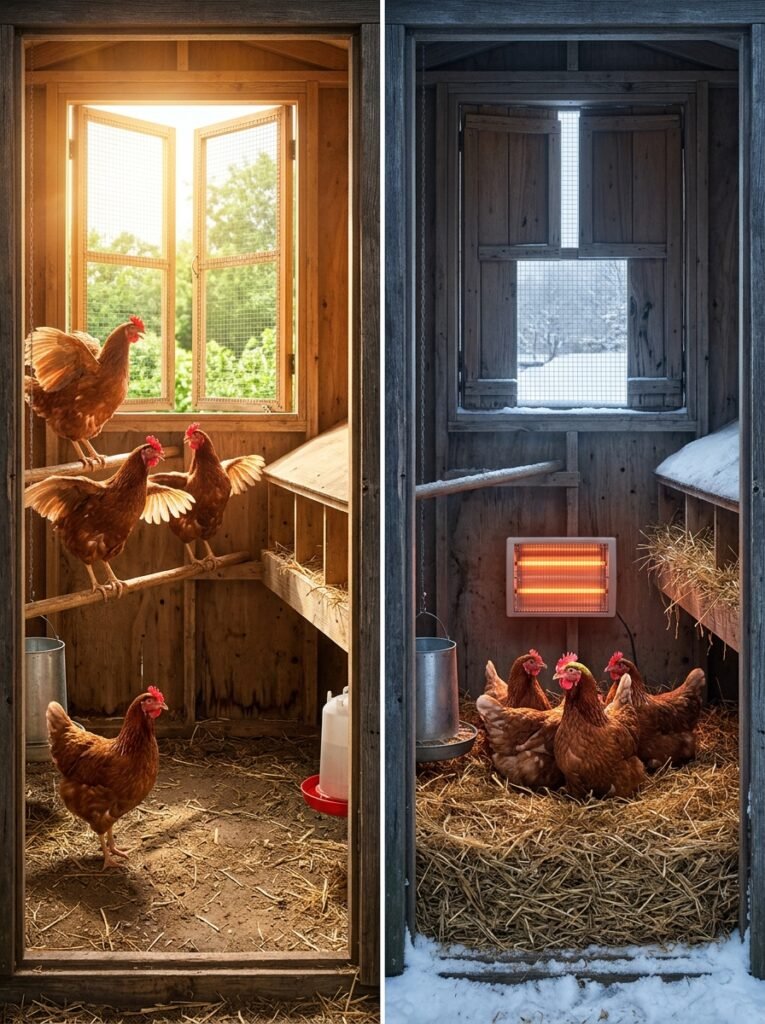
In summer, maximize ventilation by opening adjustable windows fully, removing unnecessary bedding layers, and ensuring shade reaches interior spaces during peak afternoon heat. Chickens are far more susceptible to heat stress than cold stress, and a dark, poorly ventilated coop in August can be genuinely dangerous.
In winter, add deep bedding layers for insulation, use the deep litter method actively, and reduce ventilation openings slightly — though never eliminate airflow entirely. If you’re in a genuinely cold climate, consider adding a small-wattage flat panel radiant heater rather than a heat lamp, as heat lamps are a leading cause of coop fires. Frostbite prevention through ventilation and petroleum jelly on combs is far more effective and far safer than trying to artificially heat a coop.
—
12. The Small Interior Details That Make the Biggest Difference Over Time
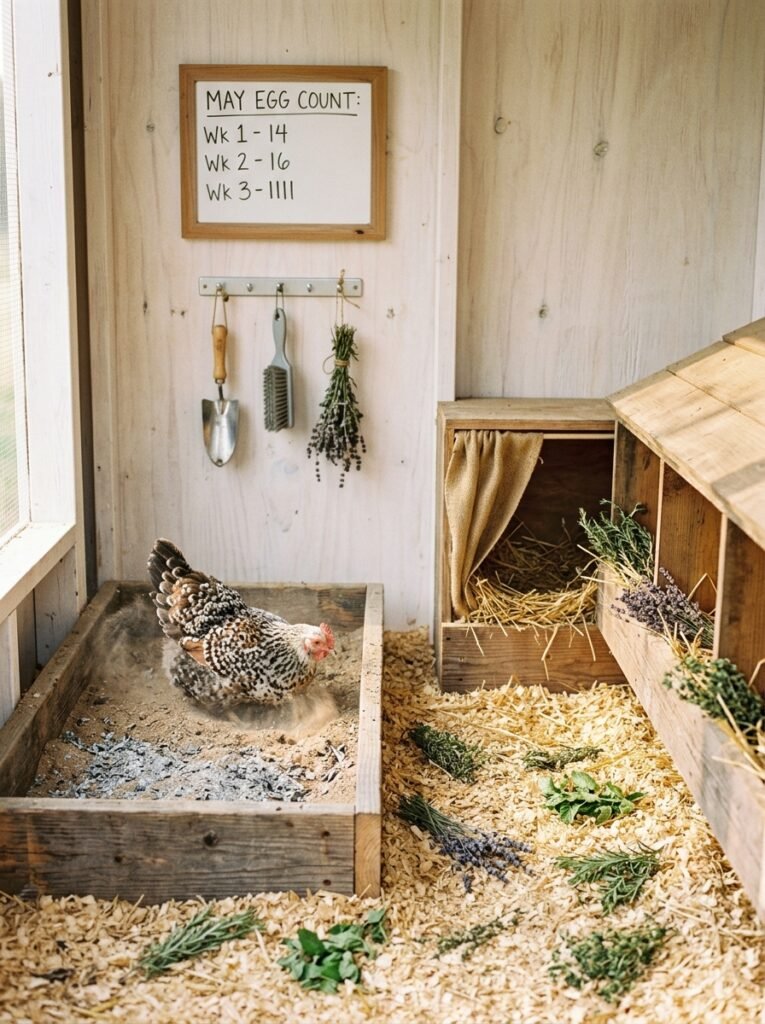
After years of tending chickens, experienced keepers will tell you it’s the accumulation of small interior choices that separates a functional coop from a truly exceptional one. A dust bath area built into one corner — a simple wooden frame filled with fine dirt, sand, and wood ash — gives birds a critical behavioral outlet and helps naturally control external parasites. A dedicated broody corner with a slightly more secluded nesting box can reduce stress during hatching season. Hooks for hanging tools, a small whiteboard for tracking egg counts, and a dedicated spot for your cleaning supplies all make daily routines smoother and more sustainable.
Herbs scattered through nesting boxes and strewn across the floor — lavender, rosemary, mint, and thyme — aren’t just charming touches for the photos. They have genuine antimicrobial, calming, and pest-deterrent properties that support flock health in subtle, cumulative ways. Small touches. Real results.
—
🌿 How to Take Care of Your Chicken Coop Interior
Maintaining a healthy coop interior doesn’t have to feel overwhelming. Think of it as a simple daily rhythm rather than a daunting chore.
Scrape your droppings board every single morning before you let the birds out — it takes less than two minutes and prevents ammonia buildup more effectively than any other single habit. Check your waterers and feeders daily for contamination or spills, and refresh nesting box material weekly or whenever it looks damp or soiled. Do a moderate cleanout monthly — remove the top layer of bedding, check for mite activity along roost joints and in crevices, and inspect walls and floors for moisture damage. Twice yearly, do a full deep clean: remove all bedding, scrub every surface, allow the coop to dry completely in sunlight if possible, and treat the interior with food-grade diatomaceous earth or a natural poultry-safe disinfectant before laying fresh bedding. Let your nose guide you between cleanings — a healthy coop smells like earth and straw, not ammonia. The moment you catch a sharp chemical smell, act immediately.
—
❓ FAQ
Q: What is the best bedding material for a chicken coop interior? A: Pine shavings are the most widely recommended option for coop interiors — they’re absorbent, relatively affordable, easy to find, and compost beautifully. Straw is excellent for nesting boxes and adds warmth in cold climates. Avoid cedar shavings, as the aromatic oils can irritate chickens’ respiratory tracts with prolonged exposure.
Q: How often should I completely clean out my chicken coop interior? A: Most experienced keepers recommend a thorough deep clean twice per year — typically in spring and autumn. However, your daily and weekly maintenance habits determine how often a full cleanout is actually necessary. Using the deep litter method with consistent spot-cleaning can stretch the time between full cleanouts significantly while maintaining a healthy interior environment.
Q: How many nesting boxes do I need for my flock? A: The standard recommendation is one nesting box for every three to four hens. In practice, most hens show strong preferences for the same one or two boxes regardless of how many are available — but having adequate options reduces stress and competition. For a flock of eight hens, three boxes would be a solid minimum, with four offering comfortable flexibility.
—
💭 Final Thought
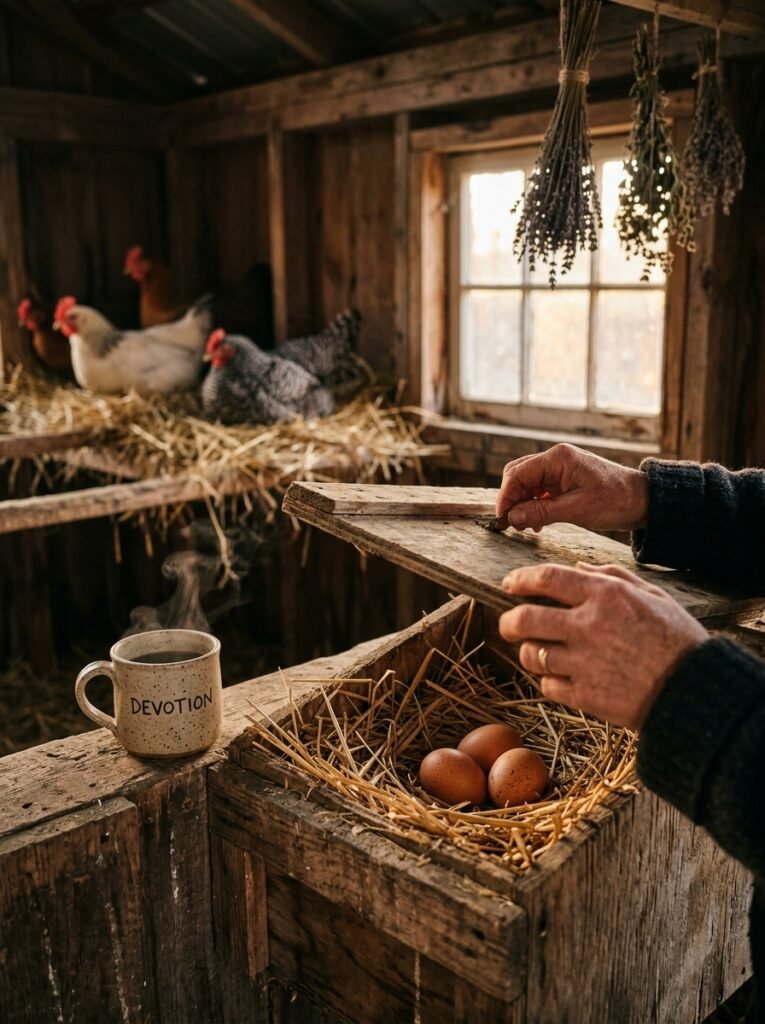
A well-tended chicken coop interior is, at its heart, a small act of devotion — a commitment to the lives that depend on the choices you make inside that little wooden structure in your backyard. When you get it right, your mornings change. You walk out with your coffee, lift the nesting box lid, and find a row of warm eggs waiting. Your hens are calm. The coop smells like earth and herbs. Everything is as it should be.
So as you plan, build, or improve your own coop interior — what’s the one change you’ve been putting off that you know would make the biggest difference for your flock?